Today, let’s look at a key piece of documentation that you will receive one for each MFC in a new unit and with each recalibration, your calibration reports. We will also take a look at 2 optional items, incoming verification data and a certificate of calibration, and why you might want to request them. There is never an additional cost to obtain this data. You can click one each document to enlarge it below.
CALIBRATION SHEET

The Top
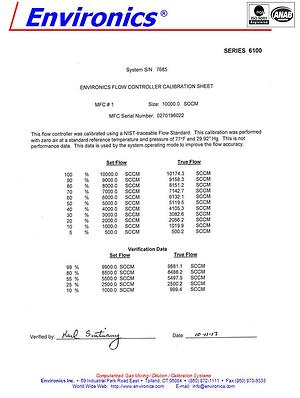
At the top of each calibration sheet you are given the general information of the MFC that was calibrated. This includes the Series type(for example, S6100 or S4000), the unit serial number, and the MFC number, size and serial number.
Below this, you will see noted the calibration gas as well as the standard reference temperature and pressure used in the calibration. Here you also note a comment that the calibration is completed using a “NIST-traceable flow standard.” What does that mean? NIST refers to the National Institute of Standards and Technology. The statement means we can, upon request, provide an unbroken chain of calibration documents that connect your calibration back to NIST. Depending upon your application, this may or may not be needed.
The Middle
This is the nitty gritty of the calibration sheet, the data. The first column shows the 11 set values that make up the calibration curve. The second column lists the corresponding true or read values. As the calibration sheet states, this is NOT performance data. Instead it is the data used by the system to improve your system’s accuracy. You can learn more about this here.
The Bottom
All calibration sheets are signed and dated by the calibration technician who performed the calibration.
Your calibration sheet will also include the final verification data for the MFC in this section. Unlike the calibration data in the center of the sheet, this IS performance data collected following the calibration. From this, you can see evidence that the flow meets or exceeds our 1% accuracy specification at each of the tested verification points along the flow range. Older calibration sheets do not show this final verification data, but it is always collected and available to you upon request.
INCOMING VERIFICATION DATA – RECALIBRATIONS

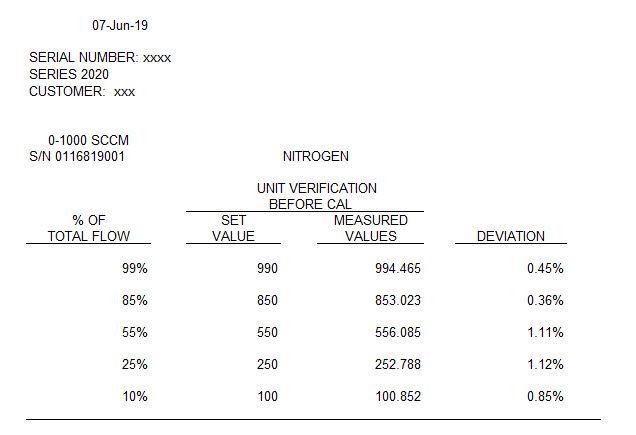
When you return your unit for routine service, the first step of flow calibration by our Calibration department is to test the flow of the unit at 5 verification points for each MFC. This data lets us measure the accuracy of the unit when it arrived as well as detect any problems with the MFC. If you would like this data, it is always available upon request.
CERTIFICATE OF CALIBRATION
Do you require additional details on the traceability of the calibration? Then a Certificate of Calibration might be what you need. Unlike the Calibration Sheet, you would be provided one Certificate of Calibration for the unit. Let’s take a look at the useful data provided on the Certificate.

The Top
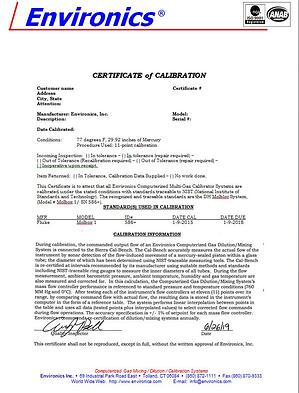
Each Certificate is provided a unique certificate number. The top portion of the certificate also provides information on the owner of the unit as well as the unit itself, including the model and serial number. The date of calibration, the calibration conditions and procedure used are also noted.
The Middle
As we move down the Certification, you then have information on the status of the unit upon receipt. New units would have this marked N/A. This summarizes the finding of the Incoming Verification and notes if repair, recalibration or no work is required. Even when a unit is in tolerance, a calibration is typically still performed to bring the unit more tightly in spec, typically less than 0.5%. If you only want your unit calibrated if it is outside of the 1% specification, you would just let us know this prior to returning the system for service.
Next, the Certificate will note which of our flow standards was used in the calibration. The standard is listed by both model and serial number, and the calibration date, due date and accuracy specifications of the standard are listed. You will note that the Certificate, like the calibration sheets, states that the calibration is traceable to the (NIST).
The Bottom
Finally, we close out the Certification with detailed information on the calibration process and the signature of the Quality Inspector who verifies the proper completion of the calibration process. We also document that “This calibration and verification were accomplished by qualified, trained personnel directed by our ISO procedures.”
We are proud to say our two lead Calibration technicians combine for 39 years of calibration experience with us here at Environics. We welcome your questions on our calibration documentation. You can always contact us through our website, email or by calling 860-872-1111.

